Monday, June 8, 2015

Quick and Dirty No Weld Spring Fuller

Hello and happy Tuesday!

I've been working on a pretty big project off and on for a little while. Now I'm at a point where I have to fuller a bar with 5/8" diameter depressions. I initially was going to do it with a pair of 5/8" rods and a striker. However, over at /r/blacksmith someone asked for a (quick and dirty) spring fuller for our first Tutorial Tuesday, and I can't help but open my big mouth and volunteer.

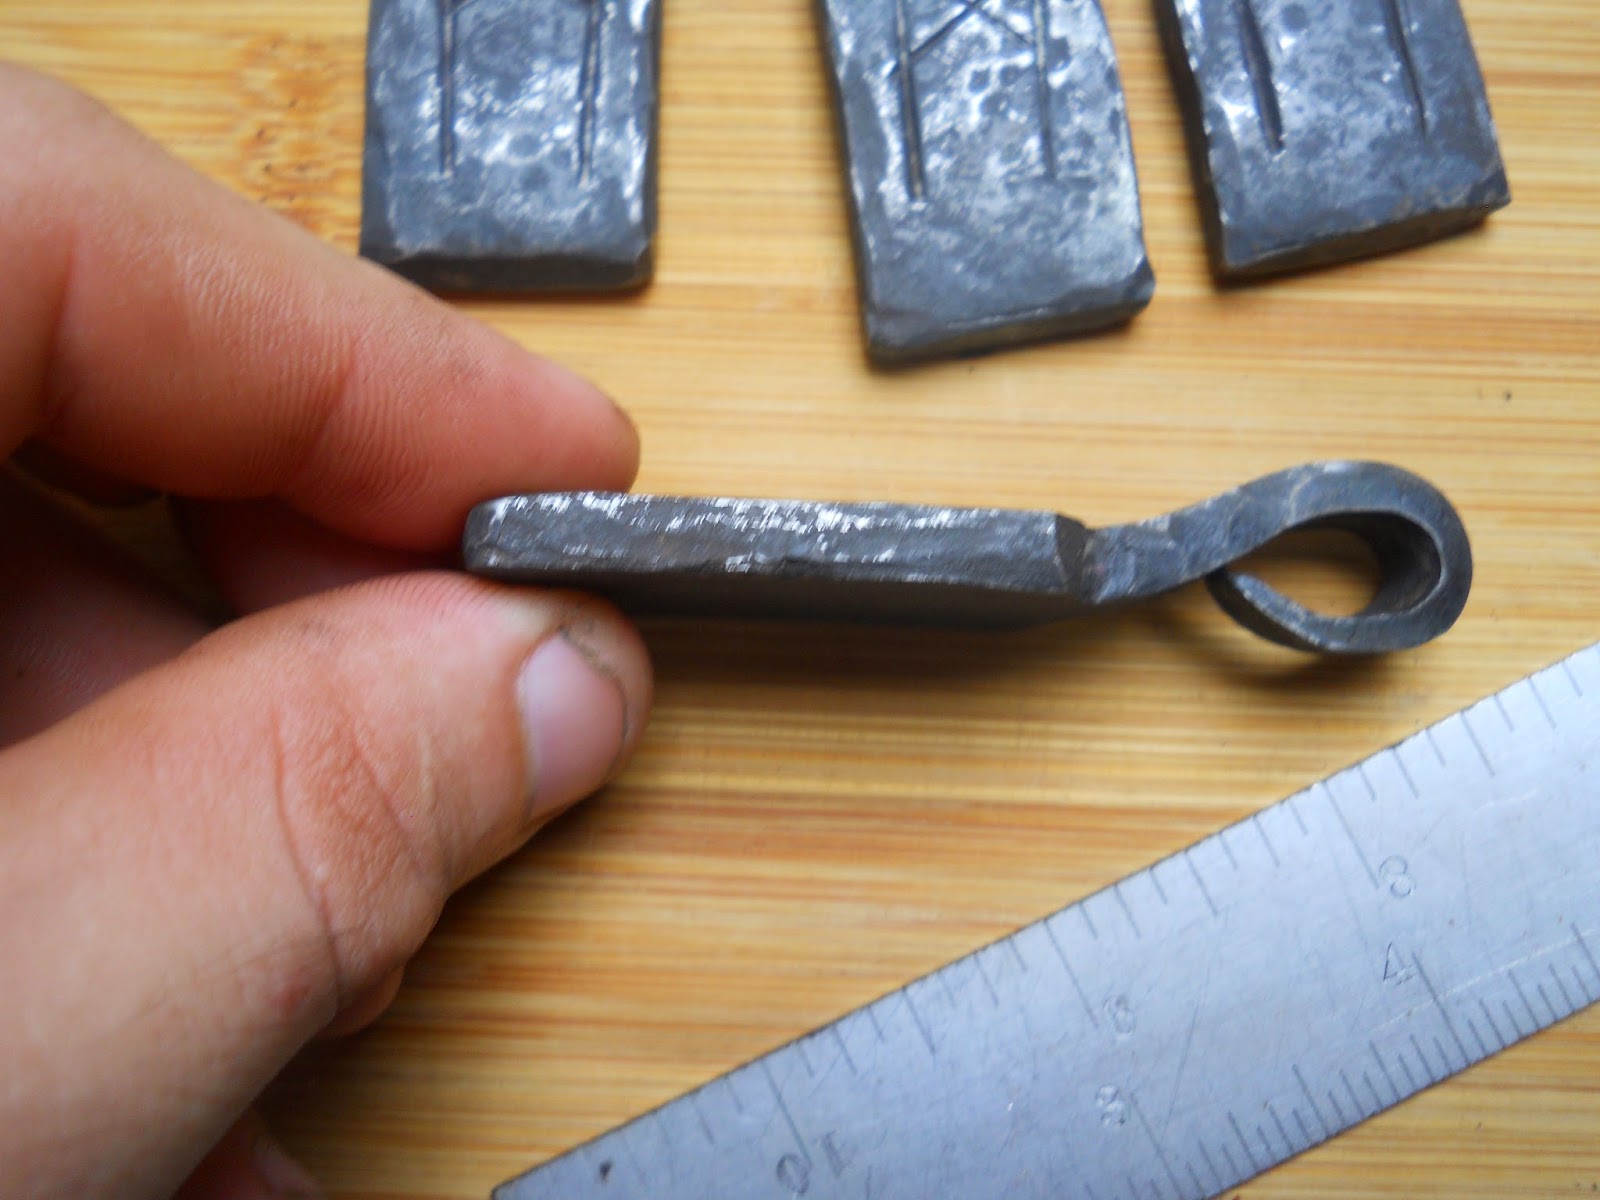
(Mostly) Finished Product


So Friday I went out and surveyed my domain for a piece of metal the right size. I happened to have a test piece from the early development stage of the same project. I had made a few different scroll ends to see how it would look and tested my scroll form and scroll starter. I have no further need for these parts, so one of them will become my new 5/8" spring fuller.

 At this point I laid it on my (old, beat up) anvil and measured how much room I had before having to deal with the scroll. I had about 14-15 inches, so I decided to make the bends for the hardy hole before straightening the scroll to avoid extra work.

I laid out marks for bends at 5.5",  7.5", and 9.5". As a note, this particular anvil has an unusual hardy hole dimension of 1 1/4" square instead of the normal 1" square. This made bending the 5/8 double an acceptable method for fitting in the hardy. Smaller holes will require more work on the shank for a fuller of this size, but I doubt I'll use this particular fuller very often. A 1/2" fuller is more useful anyway.

I then center punched my marks, heated the bar to a nice orange heat and made the first bend in the vise as shown. On these bends, it's important to make the radius of the bend as small as possible. I made sure to have plenty of heat and to pull back on the bar to tighten the bend. You could beat it into a 90 degree angle with no radius, but I was going for quick.

I forgot to take a picture of the second bend being made, but it was made with the long end gripped in the vise. I went ahead and tested to see how much work needed to be done to make it fit in the hardy. You can see that it doesn't go in straight yet. If you were working with straight bar, instead of this scrolled bar, it would be more convenient to make the middle bend first, make it fit into the hardy hole, then bend down the ends.

I then  flattened out the slight bulge at the end of the shank to make it go in straight. With it in the hardy hole, I bent the scrolled part down, making the third bend. While I had heat I knocked everything down flat and flush against the face of the anvil. It looked really cool at this point (check out that big picture below). I think my time was somewhere around 30-45 minutes, including starting the fire and taking pictures, so time was looking pretty good.


In order to make this go faster, I wanted to skip on tongs for as much of the build as possible. Your hands are the best tongs you have, but they don't like heat and they are harder to fix or replace. So I tossed it in the quench bucket for a few seconds.

Now is the time for straightening out the scroll. This stuff is much easier with a little heat. Ignore the unfinished/abandoned projects scattered around the forge....

This is a handy little tool which is very easy to make. Take a steel bar, 1"x whatever. Cut it as long as you want. Punch centers however far apart. Then drill a few holes the same diameter as your bending pins most of the way down. Then drill a smaller hole from the bottom of the holes all the way through. I used 1/2" bars and spaced the centers at 1 1/4" and 1 1/2". Bendy bendy. Two heats later, it's straight enough.

This is a step that you can skip if you're using a bar smaller than 1/2". I flattened out the spring section to make it less stiff. I'm sure that I could figure out an equation to correlate the bend diameter to the thickness of the spring section, but I don't think it will be necessary. I drew it out over the horn to about 1/4" thick by about 3/4" wide. You don't really need tongs for this if you're careful to frequently cool the end you plan on holding.

Here's how it looked after 2 or 3 heats. I drew this out to about 12 inches long. Make this even and straight if you're a perfectionist, but it's not that important to its usefulness. I did because I don't like things to be very ugly. (Ignore my anvil and hot cut....)


Here I have set my square to the length to the first bend. This is a handy tool too. You could make one if you're more masochistic than I am. Go buy one if you don't already have one. Plastic is a bad idea, by the way.


You can see that the end of the blade is at the end of the drawn out portion. The square is where I will be cutting off the extra material. I sure am glad I didn't bother straightening that part out. Mark that sucker with a center punch. Be sure to brush off the scale when it's hot so you can find that mark.

I only used tongs for one heat so far, and I don't plan on making it 2. Cool the part with the bends for the hardy, then heat your mark for cutting. Ignore the Frosted Flakes box. That's where I keep my newspaper for starting the fire.

Unfortunately this picture is too blurry to see my mark. I wasn't able to make a pretty of a cut as I would have preferred because the scroll got in the way of cutting all the way around. We'll take care of that in the next step.


It's important to have a little radius at the end of these bars so you don't leave marks when you use the end of it. Angle the bar up and the face of the hammer down and vary those angles as you rotate the bar. Using those instructions just smack it with your hammer until it looks right.

Here she is full length. 

Now it's time to heat it up for the bend. You want to get as much of the flat area hot as you can. It's much easier to do this next part in one heat.

You can do this part over the horn of your anvil, using bending forks, or free hand. I used my bending fork and a bending wrench. Don't quench this tool. You want it soft since it's getting pounded on and you occasionally want to change the shape of it.
Placed in the hardy hole to show off.


Be sure to file the faces nice and smooth. This makes the tool easier to use since the metal can flow past it better. It's also important to keep from marring your work. I forgot to take a picture of it again in the hardy after filing the faces and ends, but you get the picture.Beginning to end: 2 hours 30 minutes, including pictures and starting the fire.


Thursday, April 9, 2015

Film Work

I've been busy working on a pretty big project for the past few weeks and haven't had anything good to put in the blog, so here's some past work!

 Here is one of the many belt buckles I made for a guy who was starting a small business on hand made belts. I sold him about 30 buckles just like this one. At some point he sold the buckles individually on his website (with credit given, as well as a %150 markup [to be fair he had to pay shipping and import taxes.)]  Some of these belt buckles were bought by a costume company that contacted him to arrange to get some of a different size. He forwarded me their email and we started talking about what they would need.


I first thought it would be for a play or a low budget company film. At some point it came out that the company was making costumes for a Vin Diesel movie! Needless to say, I was shocked. But they told me what they wanted and we hammered out the details (pun intended). I made them a nice stock of 10 smaller buckles like the ones to the right. They were very happy with them and used them all over the place and had to order 10 more. I sold these for $25(US) each. I had been selling the larger ones for less before I realized how much I was undercutting myself.

After a few weeks they realized that they needed more of the big buckles and were having trouble getting duplicates of some items which they ordered from a blacksmith in Europe. They sent me a few pictures and measurements and I got to work. The pictures will speak for themselves.


Thanks for looking! I'll be posting more soon. I have a pretty cool project to show you and when I get time I'll remake some of these items with a tutorial to go with it.

Sunday, March 15, 2015

A New Turnscrew (or Two)

Hello!

Last week I decided that I wanted to see how much better of a turnscrew I could make than my 14 year old self. However, after I thought about it over the week, I realized that I actually do need a good pair of flat screwdrivers that don't take up so much room in a tool drawer, one big, one small. 


So I went out and started up my forge and picked out some 1/4" and 3/8" square stock to make a set of screwdrivers. I cleaned out my firepot, picking all the clinkers out and tossing them in my handy paint pail. Then I threw a handful of wood shavings and a couple balled up news sheets.


Piled on the coke and lit it with a propane torch. A few cranks of the blower handle later I was able to put in my steel to start heating it up. This was part of the process that used to take me a long time when I was just starting out. I used to build a small wood fire and slowly add in coke and coal. Now I've learned how to pick out all the hard pieces of coal that haven't turned to coke and pick out all of the clinkers. Then all you do is mix a few little pieces of coke in with the shavings, toss in some tightly wadded up news paper to burn slower, and cover it all up with light, airy coke. I also used to use a lighter or matches, but now I have a propane torch....


These are the pieces which I started with. Note that the ruler is 6 inches long. The longer bar had about 2 inches removed later in the process. I chose key stock for this project, which is typically 1020 cold rolled steel. If I make another set, I will order some different steel, like 1045 or 4140 to give a little more durability.


After tapering the pieces to points, the 3/8" stock gained much more length than the 1/4". It's obvious when you think about it, but I wasn't at the time. The larger cross section required less of the original length to make the 6 inches long taper, so I cut off about 2 inches of the thicker piece so the finished product would look proportional.

 After the tapers were smooth and straight, I bent the pieces at 90 degrees. This step is a little more involved than just bending them. They are bent and then both ends are hammered toward the joint to create a sharper corner than from a plain bend. This is called an upset corner. I did not fully upset these corners because the scroll will be closed, and a sharp corner would damage the part in contact with it and it wouldn't look right anyway. Who needs sharp corners when you can have sexy curves like these will?

Oh, yeah, looking good! These were done with just hammer, tongs, and anvil. Bending forks would be nice for something bigger, but if you're careful and have a little practice, you can get consistent and attractive results without having to set up different tooling. You can see that I started one end and then moved to the other end. I did the big curve over the horn of the anvil first since this part will soon have the scroll inside it, making it hard to adjust. Then I was able to do the rest of the spiral over the edge of the anvil.


Here is a view of the finished scrolls. They're unusually similar to have been free-hand forged of different sized stock. I impressed myself with these little beauties. Next I get to make them into screwdrivers!


Here's a slightly blurry picture of them after the end bevel has been added. In retrospect, I should have extended the bevels back by another half inch or more. These bevels are a little more steep than I would ideally like. These could be left as they are, but I want them to be pretty. There is too much straight line against the gracefully tapered and spiraled scroll ends.

Plain twists are just that: plain. And boring. Here you can see the chisel and hammer I used to start the incision for the incised twists I plan on using on these screwdrivers. The larger turnscrew will be getting what's often called a Hofi twist. It's basically a modified incised twist.


I almost forgot to take a picture after filing the notches, so you get to see it hot. This is the first time I've tried this particular twist, and there are some changes I'll be making in the future. This time I used a square file to make the notches, which is okay, but after the twist the notches opened more than I wanted. From now on, I'll use my triangular file, more closely spaced. This will give sharper looking points and less space between them.


Here is a shot of them after the twisting, next to the wrench I used to twist them in my vise. At this point they are already quite attractive, but most things are even better when you knock off the scale and shine them up a little. 

I took them and shined them up on the wire wheel and flattened out the tips of the screwdrivers to make them more useful and below you can see the finished pieces.

Thank you for reading. If you have any questions or ideas for future projects, please feel free to mention them in the comments. If anything I said didn't make sense or was unfamiliar, point it out and I'll try to make another post as a guide on the topic.

--DC

Sunday, March 8, 2015

Introduction

Hello!

I'm Derek, welcome to my blog.

I decided to start this blog months ago to start showing my work and ideas to more people. But, it took me a while to finally post something. I'm generally pretty reserved, but my wife says I should start a blog to become a bit more sociable.

I have been forging off and on for the past 2 years, and reading about blacksmithing and metal work for the past decade or so. The first time I picked up a hammer to hit hot metal was when I was 13 years old in blacksmith shop older than my great-grandparents. It had been disassembled and moved to this Boy Scout ranch about 10 years before. I wish I could remember where it came from, but that was 15+ years ago.

The class made turn keys (slot-head screwdrivers) and candle holders. I still have the turn key, but the candle holder is AWOL. I took a few pictures for sentimental reasons.


This piece has its good and bad points. There are definitely more bad ones, though. There were lots of hammer marks on the blade and you can see it was filed crooked. If you look closely I burned the tip of the spiral, which is uneven and starts off without a sharp enough bend, but the taper is pretty even and free of obvious hammer marks. The twist is crooked, but pretty even and it terminates close to parallel.


 Here you can see that it's pretty far from straight and how I didn't know how to angle the steel to match the taper of the horn of the anvil to keep the scroll from twisting.

Even despite all the flaws, the adults there were very supportive and complimented me on the evenness of my twists and the nice reversed twist on the candlestick I made. I guess that positive, encouraging attitude is what planted the seed for a life-long love of metalwork, and I want to be that guy for young people today.


I planned on forging a new turn key and taking pictures along the way to show how to do it better. But this is how my shop has looked for the past week or so....


I guess it's finally time to dig those drainage ditches I've been dreaming of for the past 2 years.

Not that a little rain will stop me from forging, but I've been trying to hook up electricity in my shop, which takes forever, and is no fun when it's cold and wet.

I'll be able to forge a new one soon since I'll be leaving my full time job in 2 weeks to devote more time to finishing my degree and preparing for the FE exam. I have a few more projects in the works, as well.

Thanks for visiting my blog! Keep coming back, since I plan on making at least one post per week for the next few months, and more often after that, depending on where life goes.

--DC